|
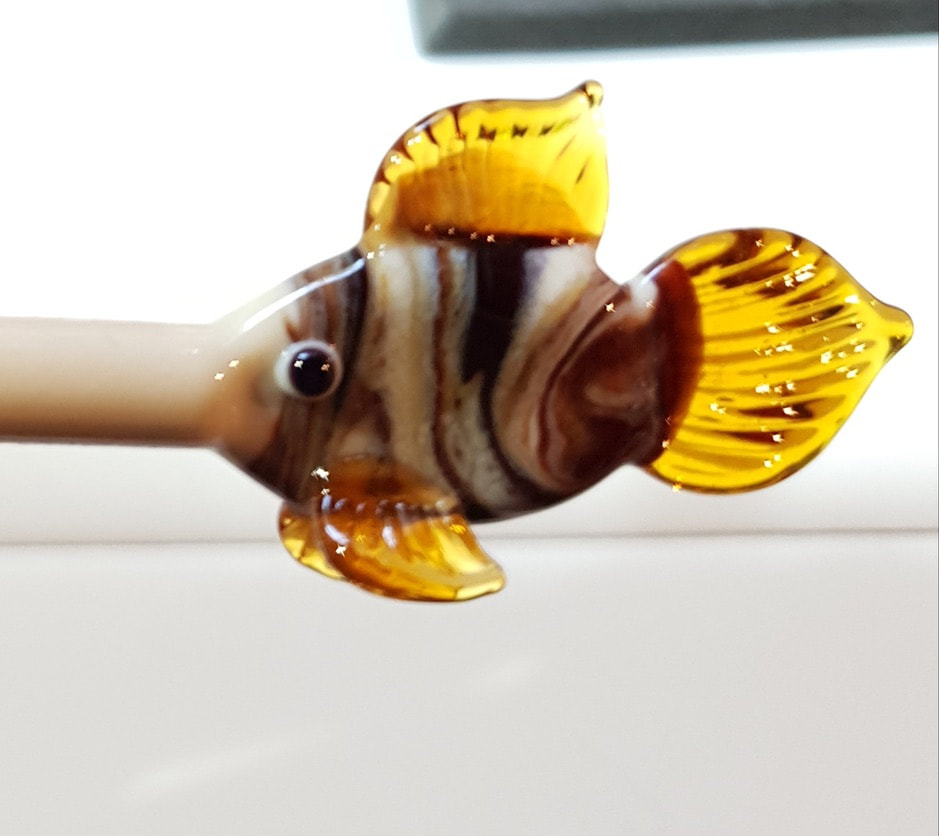
Following on from last month's post we thought we'd show another cool thing to do with your shorts, once you've joined them together so you don't burn your fingers of course. Fish! These are a great way to begin off-mandrel sculpting skills; small and simple, cute and colourful, and very popular with customers and their kids.  First choose your colours; you're going to be mixing them so you don't need very much of any single colour, and this is a great time to experiment and see what happens when you mix periwinkle with ink blue, or black with white - both make great and very different purples. Choose a coordinating transparent colour for the fins and tail, and a black and a white stringer for the eyes. Heat both rods and once they're happily glowing smoosh them together by joining their tips and then sliding each along the other for about an inch. Watch the heat and when the whole joined section is molten and smoothing out begin stirring them into each other being careful not to trap any air. You want the glass to be flowing easily into itself as you mix. The more you mix the more homogenised the resulting colour will be and this stage is quite mesmerising as the colours mix and do their own thing. We like to stop at a point where they've marbled together forming fascinating and unique patterns and reactions. Don't you just love that dark ivory? Gently flatten the blob of colour and heat out the chill marks as you marvel at how gorgeous it looks. Pull the glass into a slightly more elongated fishy shape, we use a small clear stringer for most of these sorts of manipulations. Using your chosen transparent colour/s add a mass for the tail, the dorsal fin and two ventral fins. Transparents look lovely because they glow in the light but are also easier here because they tend to be stiffer and will hold their shapes better while you work. With your flat nose pliers or a fin masher, texture the tail and pull it into a pleasing shape. Likewise, press the dorsal fin and then the ventral fins. Give these a slight pull away from the body of the fish to make it easier for the finished fishy to stand, balancing on these and the base of the tail. Now it's time for the finishing touches. A dot of white or another colour that contrasts with the body, followed by a smaller black dot and suddenly you've brought the fish to life. If like me you have trouble getting the eyes lined up use your peters tweezers or bail biters to gently press even indentations as markers for where to place those dots. Nearly there! Shape the dorsal fin and leave the rod attached by just a small point - stretch it out and away from the fish so it's easy to remove without cracking your fin later. And then make your mouth, here Que has added a dot of contrasting colour and taken the shot before the final press of the mouth - it's not easy making and shooting each stage of the fish by yourself, let alone remembering which steps to take photos of. As you can see her fish didn't object to being repeatedly held out of the flame to have the progress shots taken. These are so small and simple you really don't have to worry about them getting unhappy or cracking during the making, providing you remember this: The most important rule in sculpting with soft glass is NEVER GO BACK! Once you've pressed and shaped each little element to your satisfaction, leave it alone and be careful not to let the flame hit it again. Always try to work from the larger mass outward to the smaller ones, and all will be well. Here are some other fish showing off their indented mouths which give them such character. You can also use a knife blade to crease across the mouth which gives puffy kissing lips (my favourite method).
Have fun making your own school, and if you do and you share them please tag us so we can see your creations. |
AuthorWrite something about yourself. No need to be fancy, just an overview. Archives
January 2022
Categories |
Glass Mad


 RSS Feed
